|
Tutorial |
In this tutorial I want to show how to create a distribution archive for a simple Java application. Our application has the following parts
- a Java archive for the classes and other fixed data.
- documentation as HTML with some GIF images.
- a README file.
- a License file.
- and because our application is free software, we also want to put the sources into the archive.
Index
Step 1 - prepare your application
The installer will install 'at the right place' on the target system. The definition of 'right place' depends on the operating system, the ideas of the user and on wheather the user is an administrator or not.Therefore you should remove all hard coded path names from your application and use a property file for this paths.
LiftOff makes sure that your application will be started with the system property 'datadir' defined. This property gives the path to a directory where data files can be found. To load a property file from this location, you can use something like the this :
|
|
|
public class MyProperties extends Properties { public void load( String fileName ) { InputStream is = null; // try to load from the users home dir try { String propfile = fileName; String dataDir = System.getProperty("user.home"); if( dataDir != null ) { if( ! dataDir.endsWith(File.separator)) dataDir += File.separator; propfile = dataDir + propfile; is = new FileInputStream(propfile); System.err.println("use props from users home " + dataDir ); } } catch( IOException e ) { is = null; } // try 'datadir' try { String propfile = fileName; String dataDir = System.getProperty("datadir"); if( dataDir != null ) { if( ! dataDir.endsWith(File.separator)) dataDir += File.separator; propfile = dataDir + propfile; is = new FileInputStream(propfile); System.err.println("use props from data dir " + dataDir ); } } catch( IOException e ) { is = null; } // try classpath if( is == null ) { is = ClassLoader.getSystemResourceAsStream(fileName); System.err.println("use props from classpath "); } try { if( is != null ) { load(is); } } catch (IOException e ) { System.err.println("can not load properties : " + e ); System.err.println(" use defaults"); } } } |
Step 2 - define the installer properties
Next we need to define what goes into the distribution archive and what requirements the target system must match to run our application.
This informations will be stored in a Java 'property file', which will also be copied
into the archive. You can use the builder application to create this file.
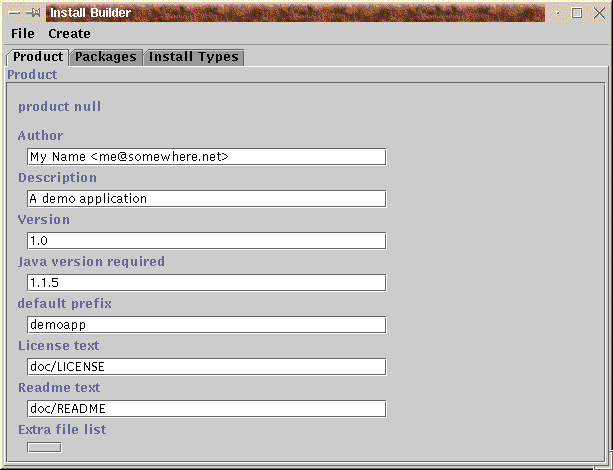
First we give some Informations about our application. The data in the fields Author, Description and Version will be shown on the first card of the installer.
The Java version required will be used by the installer to check the Java Version
on the target system. The user must have at least this version installed to install the
application.
The default prefix will be used to construct path names on the target system. For Example
if the admin of a Unix system installs the application, the default path for the documentation
will be /usr/doc/demoapp, is an normal user installs the application, the
default will be /home/.../demoapp/doc.
The fields License Text and Readme text give the names of files in the Archive to use for the license and the readme text. We look at them later.
We will use the data in the field Extra file list when we add the sources to the distribution.
![]()
Packages
Next, we define what could be installed on the target system. To use our demo application the user needs at least the Java archive. The documentation and the sources should be optional.We define three packages for the application, the base packet contains everything we want to be installed in any case, a doc package for the documentation and a source package for the sources of our program.
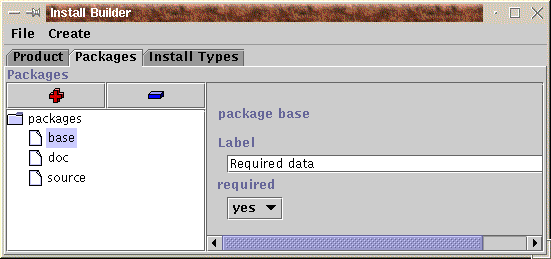
For each package we need to give a label and wheather the package will be installed in any case (required=yes) or not.
![]()
Install types You could group a selection of packages into an installation type. If the user selects one of this types, all packages that belong to this group will be selected. Our application has only three packages, so we do not use this feature here.
![]()
Java archives
Now we add the Java archive to the base package. (select the base package and press the 'plus' button). A dialog pops up where we need to fill out some fields. We must give an identifier for the new 'installable' and a type.The identifier may contain letters, numbers and the underscore. It is used to construct property names for the installers's property file.
We choose 'archive' as the type for our Java archive. We use the other types later in in this tutorial.

jar entry appears in the base package. We need to specify some
properties for this new entry now.

The field location defines where the package should be installed. For a Java archive
we choose the location jlib.
The field target name defines the name of the file after the installation. The source file field defines the name of the file on your development system.
Java archives will be put into the classpath of the application.
![]()
Program
Now we make our application executable. To do this, we add a new installableprogram
with type exec to the base package.

The field java class defines, which class contains the main method for
our application. We define bin as the location for the executable program,
target name is the name, a user can use to run the application.
We leave the fields template name and source file empty, the installer will choose the correct values for this.
![]()
Files
We want our 'README' and 'LICENSE' files to be installed in the doc location. To do this, we define two file installables named README and LICENSE and definedoc as location for them.
![]()
Property Templates
Templates are plain text files that will be filled out at installation time. We used a template already implicit - when the application is installed on a Unix system, the installer use a template to create a shell script.We will use a template to create a Java proprty file for our application. The application needs to know where its documentation files can be found. We already have a template file from step one (we needed it for testing) and we will modify this now.
|
|
|
# properties for the demo application docdir=/usr/src/project/docs libdir=/usr/src/project/lib |
We replace the paths in this file by strings of the form @variable@ where
the variable will be replaced at installation time.
As variables one can use
- all Java system properties
-
the real paths for the locations,
location.docevaluates to the path for the documentation. -
for each package a variable of the form
package.namethat evaluates to 'yes' if the package was installed, to 'no' if the package was not installed. - all properties from the installer properties file.
|
|
|
# properties for the demo application by @product.author@ docdir=@location.doc@ libdir=@location.lib@ |
We now create an installable for our template.
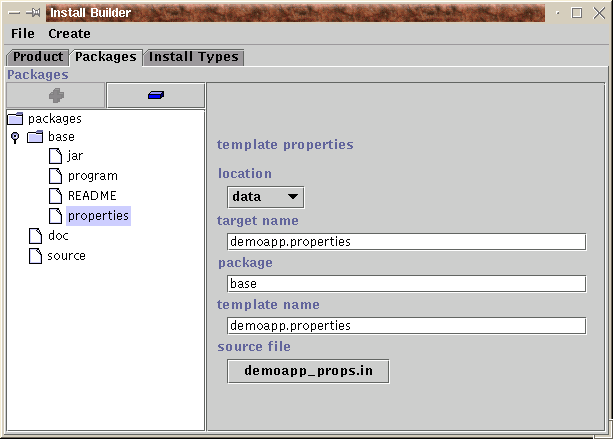
The filled out template should go into the data location. target name
is the name of the file on the target system. template name is the name of our
template in the archive and source file is the name of the file on the
development system.
You can use templates for other tasks too, e.g. you can create an installation dependent
readme file.
![]()
File lists
If we have a large number of files to add to the archive, it is inconvenient to define each file with the builder program.There is another way to add files to the distribution, file lists. We use a file list for the documentation and the sources of our application here.
A file list is a plain ASCII file, where each line contains either a filename (or two) or
a package and a location definition. In later case, the line is prefixed by a @
Sign.
If a line specifies a file then the first name is the name on the target system, the second name is the name of the source on your development system. If the source name is missing, the source name will be the same as the target name.
The target name must always be a relative path, if the source name is a relative name, this name is treated as relative to the directory of the file list.
We want to put a HTML file and some GIFs from the directory doku/html and
the sources from src/java into the archive.
|
|
|
@source:source java/Main.java src/java/Main.java java/SomeClass.java src/java/SomeClass.java java/OtherClass.java src/java/OtherClass.java @doc:doc doku.html doku/html/doku.html pic1.gif doku/html/pic1.gif pic2.gif doku/html/pic2.gif |
![]()
Step 3 - create the archive
As a last step, we want to create an self extracting archive for our application. You can do that from the applications 'create' menu. You could also create a zip archive here.

The field loader class specifies which class should be used as the loader for the installer. The default is the class that came with the software, but you can specify a different class here. You can give the name of the output directory in the field output dir. The name of the archive in that directory is determined by the name of the loader class.
If you press the OK button, a log window pops up and the archive will be created.

|
last change Mon Feb 28 06:24:23 2000
Andreas Hofmeister |